Basting Papercuts
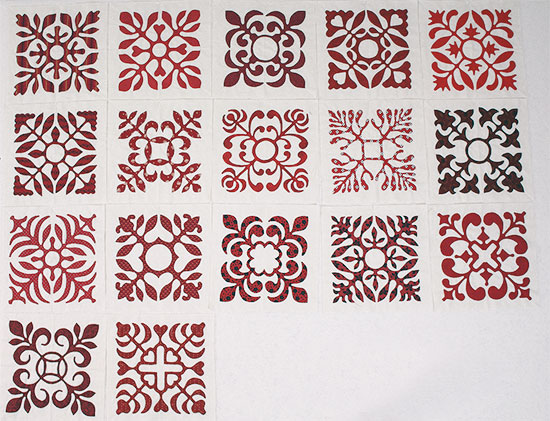
As you can see, I am powering thru Sue Garman’s Sarah’s Revival.
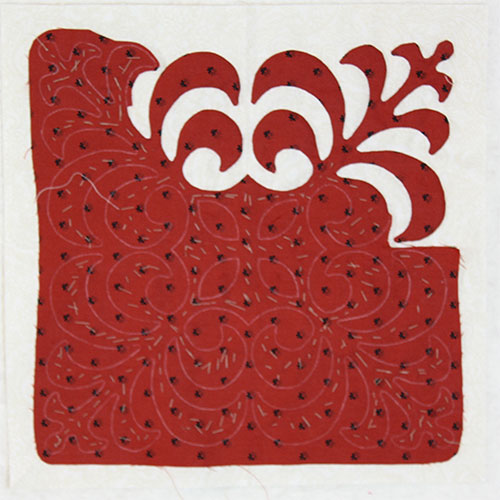
These little papercut blocks are SO much fun and SO addictive. Sometimes we need “mindless” work like this that give us a sense of accomplishment. I did prewash these on hot to remove as much “bleeding” as I could. Being a believer in starch, I starched both the red fabric as well as the background – pretty stiff. Next, I cut out the freezer paper pattern being as careful as possible. When ironing the freezer paper to the selected red fabric, I AM anal, so I used a 6” x 12” ruler to make sure that the pattern was aligned and that the four quadrants of the pattern were perpendicular. I traced around the pattern with a white mechanical pencil then I ironed my background squares in half, then half the opposite way, then diagonally. Aligning the red fabric with the folds ironed into the background fabric came next. Notice, I haven’t cut the piece of red fabric yet. I gently pinned the red fabric to the background, hand-basted, and used the cut-away method to complete the block (cut a little, stitch a little, cut a little, stitch a little).
Here is what I REALLY wanted to Blog about. Nancy Kerns TOTALLY got me into hand basting my blocks. It doesn’t take long, and I think it really makes the blocks lay flatter. This is how I had been powering along – although working full time (which is REALLY cutting into my personal time, Ha Ha), it does take me almost a whole evening to get a block ready to stitch. Then a thought hit me. Why couldn’t I baste the block in a grid formation on my sewing machine? I gently pinned the next block, lengthened my stitch to as long as the machine would allow, loosened my presser foot tension and basted. True, it only took a couple of minutes. But, from my experience . . . WHAT A MISTAKE! As I started my cut-away, there were stitches everywhere I DIDN’T want them to be. I couldn’t get at the pattern edges to cut-away, and spent more time taking stitches out, than stitching. I finally gave up – removed all basting – and went back to my tried and true Nancy Kerns method. When you hand baste, you obviously can place the stitches inside the pattern, where you want them. I also like appliqueing a quadrant, removing the basting stitches, and admiring. Nancy did share that if you keep your “junky” thread available, with needle threaded, for basting , you are more apt to grab the needle and baste. I am convinced.
I may have “strayed” momentarily from a lapse in judgment . . . but I am back on the “straight and narrow” . . . hand basting. I felt like Linus in the musical “You’re a Good Man, Charlie Brown,” trying to leave his blanket. For those of you that know the musical, I am now singing . . . “got you back again!” I am totally committed to hand basting! Thank you Nancy.
Keep Stitchin’
Barbara Blanton


Barbara, your blocks are beautiful; the variety of fabrics adds to the visual interest. I’ve made one Sarah’s Revival block with a green batik. Then I switched to a few blocks from Papercuts and Plentiful by Elly Sienkiewicz. ( I’d like to do more Sarah’s Revival but I’m being frugal right now and not buying the patterns :). I love the fact that Sue Garman’s blocks are balanced so that the entire quilt looks just right. I’m modifying some of Elly’s blocks so they look balanced, and I may design some of my own. Thank you for posting your work. BTW, I use the same method that you described. The prep is easy and then the stitching is peaceful and enjoyable. I’ve found that YLI 100wt. thread helps me when I’m working with a batik which is very thin and crisp.
I’m so blown away….3 applique quilts a year? I’m lucky to get one top done and I’m retired. I, also, learned Nancy’s method at Academy years ago and, though I have tried other methods, still come back to that one. I feel most secure with it and get beautiful blocks.
Looking forward to Academy of Applique at Kingsmill in Williamsburg, VA. We leave in 58 days. Can’t wait!